Tuesday, December 4, 2012

Machu Picchu Level

So, here are the Machu Picchu shots. The screenshots are the most up to date right now.  This level I found was quite challenging because I haven't had the opportunity to really dive heavily into creating organic assets for a lush level like this one.  I spent quite a bit of time in ZBrush to sculpt out the rocks and bricks that we used in populating the level and xNormal to generate the texture maps using both high poly and low poly from ZBrush.  The low poly was obtained through a simple decimation, nothing fancy.

Machu Picchu
 As you can see from the shot above and the two below, the level was heavy in rocks, stone, moss, grass, ivy, trees, plants and wood.  I am feeling a sense of joy looking at this level and at how far I've come so far.  Working on this level has been a true learning experience.


Left Side
Right Side

Below, you will see one of the level assets that I am working on right now.  In this level, players can jump from platform to platform and in total, there are four.  The left ramp, the wooden platform, the stone platform below, and then the rocky protrusion on the far right.  
 
Stone Platform
Then the wireframe:


Wireframe
Then a glimpse into the material shader:

UDK Material Shader for Stone Platform
 This platform, like most of the assets, had their textures fully built using simple textures in UDK.  So the stone platform used a moss texture, an AO map with an alpha channel, a normal map, and a grungy map.  All these, with some fancy node usage, created the texture that is in the game level right now.  This is different from my Junkyard assets which had full textures painted and made in Photoshop and brought in.

More stuff will be coming along in due time.


Machu Picchu Tree

I was put to work mostly on the Machu Picchu level alongside with Ryan Sullivan, the art director on Scrapyard.  He taught me a ton over the course of the first half of the project duration and I really feel that I've grown a lot since I first came on, hardly knowing anything about how to work with UDK.  Now, I've gained enough knowledge to navigate UDK and get stuff done.

While the Junkyard level was more about metal, fire and lights lighting up the dark, Machu Picchu stands at the opposite end being mostly organic and lush with plant life, spacious, bright, majestic and ancient.  At the get go, I was quickly put to work blocking out the terraces, the ruins and from there...well...everything else! :)

The entire UDK foliage package was stuff that I made with great excitement due to the fact that I never really had a solid chance to tackle foliage creation when I attended Gnomon and here was my chance!
Tree - Machu Picchu

Trees from Afar
Below you will see the texture maps that I used for the tree branches.  A quick look into my workflow: I modeled out a high poly leaf in Maya, added a texture and after some deformation, baked out it's normal, diffuse color and AO.  I then created a simple poly card which I applied the leaf texture to.

My next step was to model out the branch itself and then duplicated the low poly leaf card on the branch.  I repeated the baking process again and below is the result:

Branch NORMAL
Branch DIFFUSE
Branch High Poly in MAYA


Junkyard Level Assets

So instead of bombarding the entire site with a kazillion screenshots of every single asset I've made (HP, LP,. wireframe, normal map, diffuse, specular etc etc) I decided to just post a few to show what I've been working on.  While I've been spending the majority of my time on the Machu Picchu level, I did have a hand in making a few assets for the Nighttime Junkyard level.  The Character Hanger environment where a player would select their character and outfit them was made using my sci fi engine room scene you can see in an older post.

I had no hand in designing the character hanger or moving the props around.  So since the engine room was covered before, I'll be skipping over it for this game project.  This post will show some of the things I made for the Nighttime Junkyard level.

Ladle - Nighttime Junkyard
 The ladle above was broken up into two separate static meshes and imported into UDK separately.  Each of them received their own texture maps as shown below:
Ladle Bucket SPECULAR
Ladle Bucket NORMAL
Ladle Bucket DIFFUSE
Ladle Handle DIFFUSE
Ladle Handle NORMAL

Ladle Handle SPECULAR

Next up is the trash incinerator.  My largest PSD texture file to make those maps.

Trash Incinerator - Nighttime Junkyard
Trash Incinerator - TOP
Trash Incinerator - BOTTOM
And the texture maps:


Trash Incinerator DIFFUSE

Trash Incinerator NORMAL

Trash Incinerator SPECULAR


Monday, November 26, 2012

USC Scrapyard

Woo it's been a while since I last posted an update.  My absence has been in large due to me working on a USC senior game project called Scrapyard!  I was brought on as an Environment Artist and am now working with a great and energetic team of individuals to bring this game to life.  I will start posting WIPs here including WIP textures and, eventually, the final versions as well as shots of the levels that we are working on.

There are two levels in particular that the team is pushing for mid-Dec.  One being the Nighttime Junkyard and the other being Machu Picchu.  I've assisted in the development of a few assets for the Junkyard scene but Machu Picchu is where I've put in the bulk of my work and energy.  It's coming along and screenshots will be following!

I am also, finally, working on an official portfolio page, whenever I find the time to work on it.  Once that is up and running, my blog and the portfolio site will be linked together.  Until then, it'll be my blog all the way!

You can visit our WIP website here: http://www.scrapyardthegame.com/ where you can also watched an embedded youtube video, showcasing the game.

Tuesday, June 19, 2012

Engine Core Game Level

I have returned with a new update!  Hooray!

This is my final project for my Environment Creation for Games course at Gnomon, taught by Kevin Griffith. I LOVED this course and had been anticipating this since I first started at Gnomon.  Kevin had a tremendous amount of knowledge to pass on and his demos rocked!  Learned a lot from this class and I don't intend to stop here!  I am starting off with a sci fi scene with a fantasy scene up next!

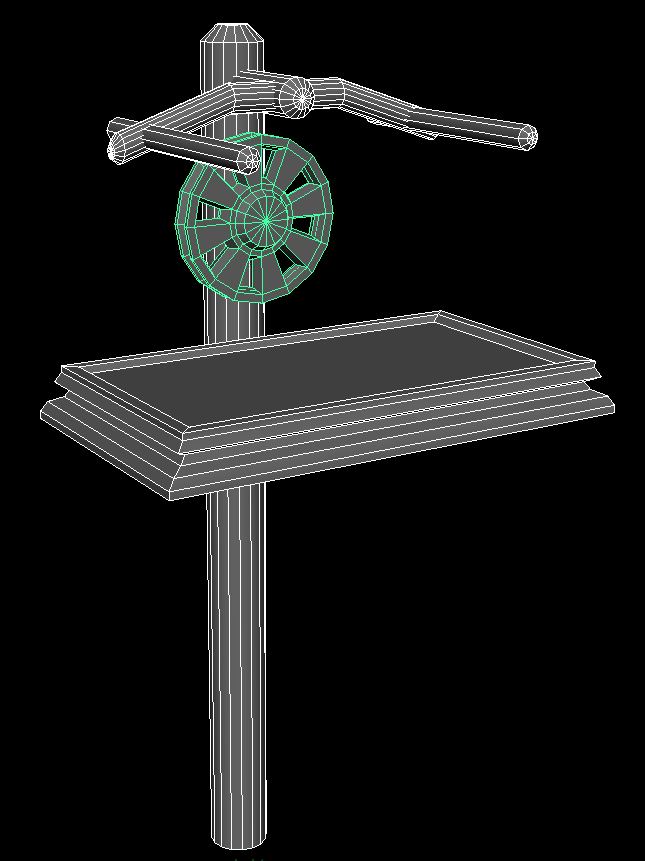
So for this scene, I was responsible for everything in the creation process (as per the requirements of the class).  So I started off with research, gathering reference images, idea generation, concept sketches, block outs in Maya, modeling, UVing, texturing and lighting.  For UVs, I mainly used Maya's UV Texture Editor, at least for the simplistic geometry.  For the more complex geometry which would have taken me longer, I took it out to headus UV Layouts which saved me a buttload of time.

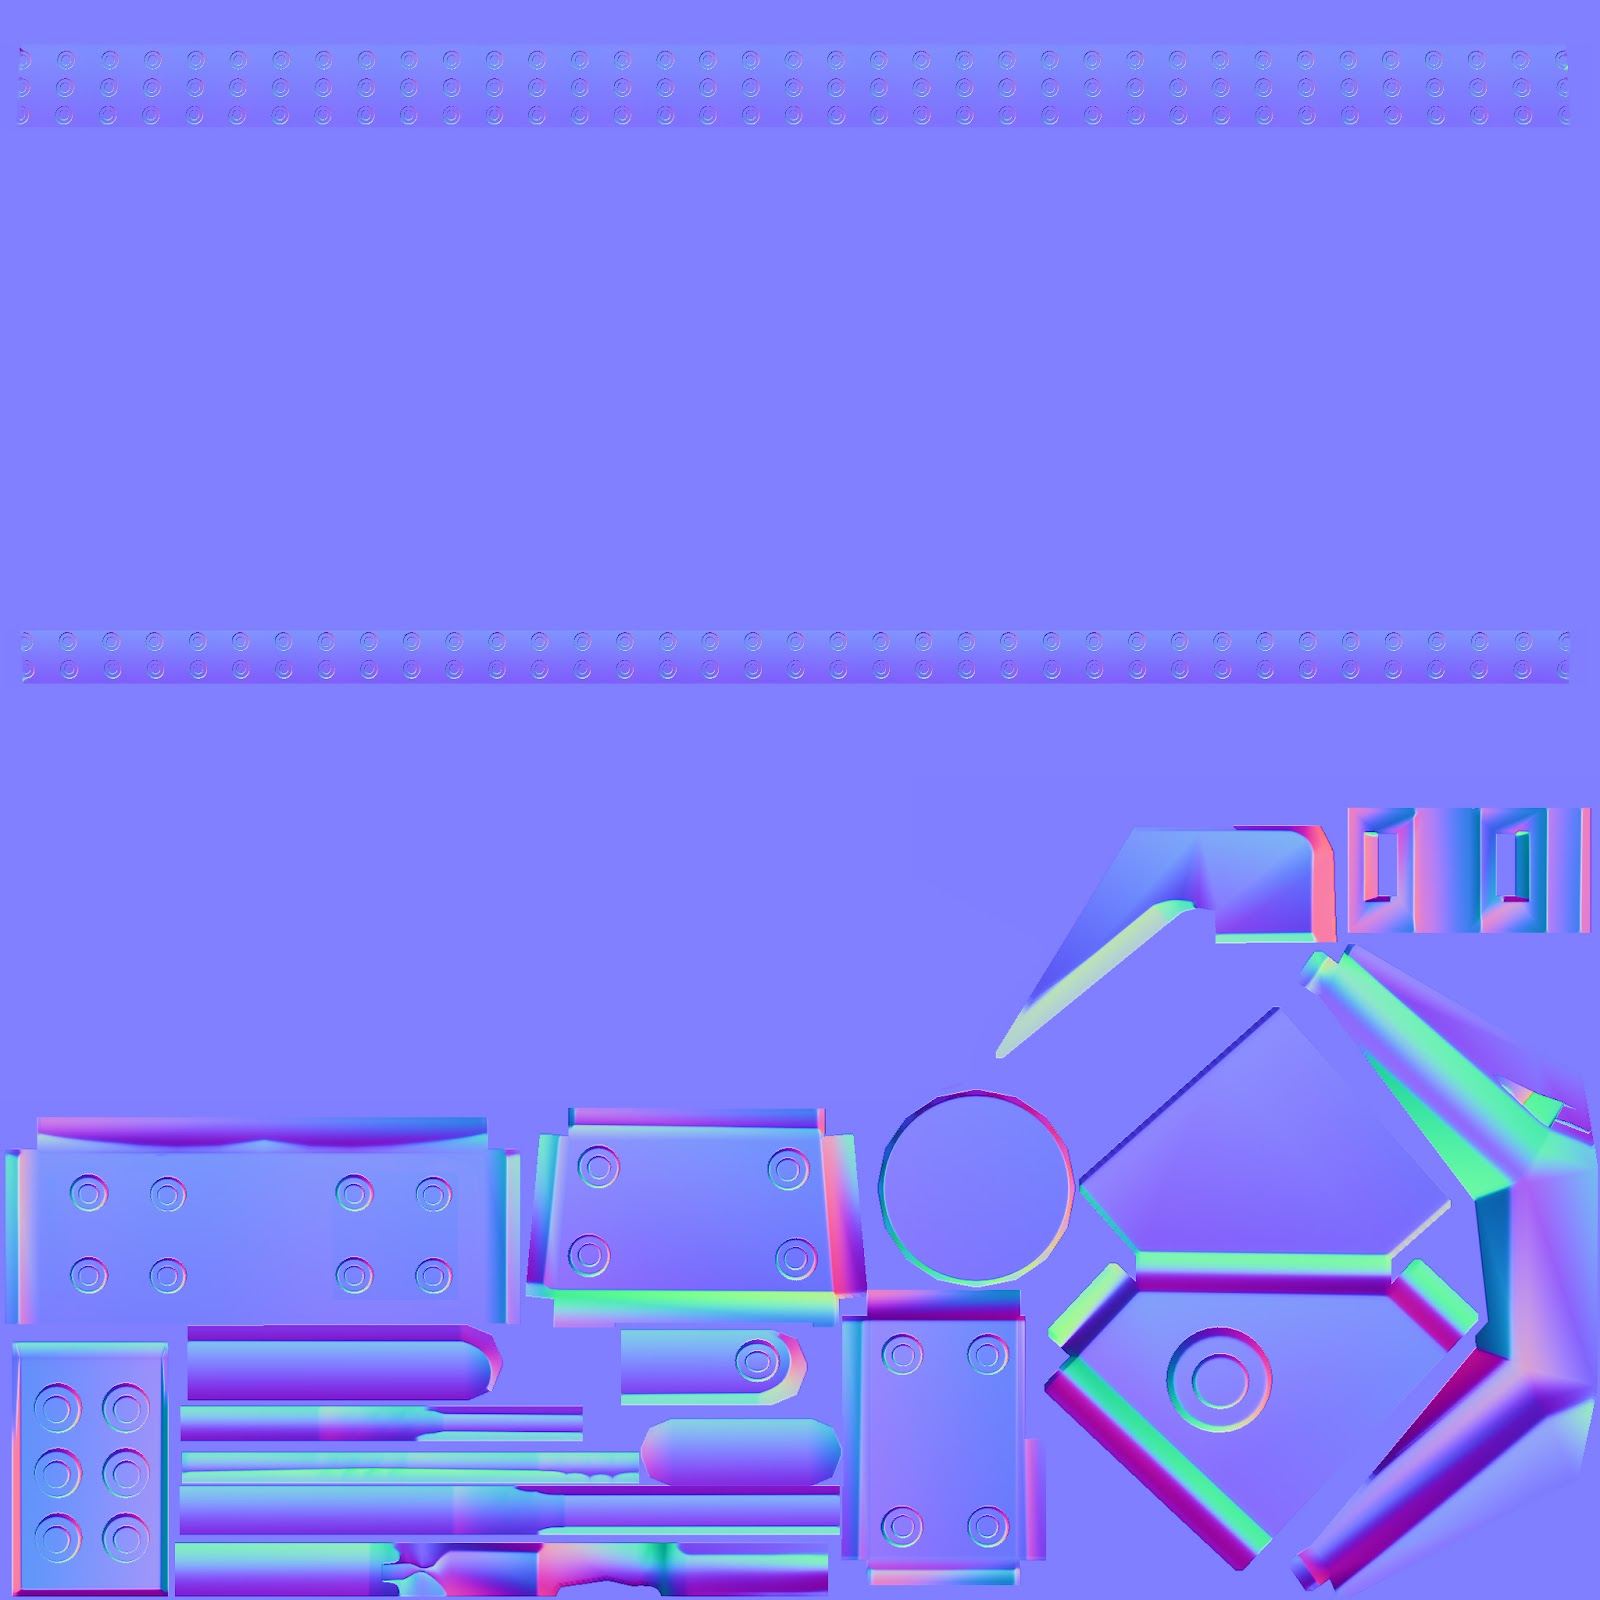
For textures, I generated the AO maps from 3DCoat (thanks Kevin for introducing this software in class!) normal maps were done using the xNormal filter in Photoshop and also from Maya's transfer maps.  There was no use of any photo textures, everything was done using Photoshop brushes.

For lights, I mainly used Maya's lights (volume lights, point lights and area lights) with mental ray to do my still shot renders.  This actually was a tad bit frustrating, apparently there is some sort of bug when it comes to duplicating lights as instances.  Good god that was messy.  Either it's a bug or something I did, but some lights would be on, others off, some would correctly have their decay set to quadratic, others would emit light as linear even after I changed it to quadratic.  Funky.

All in all, I had a ton of fun doing this.  I do intend to import this scene into UDK.  As I wish to aim for a position as an environmental artist for games, other than the software at Gnomon, I want to totally dive completely into UDK and perhaps even Unity if time permits.  But anyway, here are my shots:

Oh and as this is suppose to be for a game level, it's only right I include the tri and poly counts.  Keep in mind that I'm not even sure what kind of standard I should have for a scene of this scale, so whether my geometry detail is too much or too little, I haven't the foggiest!

Tri Count: 203,833
Poly Count: 108,373


EDIT: Decided to also throw in a pure wireframe shot of the entire scene from my viewport.


Now for a little bit of relaxation with some Maya training dvds and Diablo 3 lol!

Thursday, May 3, 2012

Concept Art for Sci Fi Game Environment

Last post for the day!  Already set to a late lunch lol.  Anyway, as I mentioned in a much earlier post, I'm taking two classes this term - Digital Sets and Environment Creation for Games.  For my environment creation for games class, I will be creating a sci fi game environment.  More specifically, it'll be the engine room of a space ship.  For the first assignment, we just had to gather references and get out plan out.  For the second week, we had to start working on conceptualizing our culture set, or prop set, for our scene.  From that, we will begin modeling stuff out, UVing, texturing, etc etc.

Not all the props will make it into the scene, unless I'm really lucky and work like a maniac.  But with only two classes this term, I should be able to.  If I don't, it's because I want to focus on quality vs quantity.  I want the important focal elements to be solid in terms of quality of the model and the textures.  The must-haves for my scene include the engine core, the large (long) terminal, and the ground light and bomb props.  

My secondary focuses will be on the arch support, wall support, the small/large crates, the walkway, the stairs and the railing.

My final focus, time permitting, will be to create the sci fi wall panels, ceiling panels, ceiling supports and anything else that might be missing from making it more of a complete scene.


Return of the Dump Truck

I decided to return back to the Caterpillar 793D dump truck which I modeled out as my midterm project back in Hard Surface Modeling 2.  I wanted to give this baby a texturing over.  Right now, the textures and lights are only in the starting phase.  I have a simple 3-point lighting setup using Vray and have some basic textures and grunge and paint peels.  Because the model was built to scale, it's freakin huge.  I had to divide up the model into 4 sections, each section having their UVs packed into the 0-1 space and receiving their own unique color, bump, spec, and gloss maps.  Although right now, I think the front section should be divided up more.  I packed everything into the 0-1, but the texture quality is not as good as it should be.  Might have to split that up.

Everything is still kinda flat and boring.  Like I said, first pass at it.  Still have much more to do and to fix and adjust, even the lighting setup is probably bound to change.  Will see in time where I take this as I work on this some more.


Room - Textured and Lit

All righty and here is a simple room!  Boring huh?  This term, I intend to make something less boring lol.  But anyway, this scene was taken from an anime - Aria the Animation, and I first built it in my Intro to Unreal class. So everything was built low poly and throw into Unreal for the sake of learning the engine.  For hard surface texturing and shading and for lighting and rendering 2, I converted everything back to high poly and worked on it as much as possible.

So this scene was lit using Vray sun and several vray rectangular lights shining in through the windows and set to portal lights.  My camera was converted to a physical cam and everything else was just normally textured, some procedural, others through Photoshop.  


Experimenting with Caustics

Caustics and photons.  Never really touched or knew much about these until we had a class that went over it.  But omg did I love working with it.  I'm so glad to have had this lecture.  Learning about how to fiddle with caustics and photons really can add a huge kick to a render.  Now my glass in the shots aren't great, but I didn't care too much about it as much as I did the caustics.  So nice.


Diffusive Materials and Compositing

Following the week of metals, we had a lecture on diffusive materials. That week, it was simply to render out the same render passes and composite them together again.


Metals and Compositing

In the 2nd week we got a look into doing render passes with render layers in Maya and had a quick review of the traits of metal.  The homework assignment was to have a couple layers, a base metal texture and a paint texture overlayed on top, and render out passes for specular, reflection, raw diffuse, color etc.  Then we had to bring them into Photoshop and composite them together.  The six below are the result of what I did for the assignment.